Showing posts with label Cake. Show all posts

Sunday, 11 November 2018

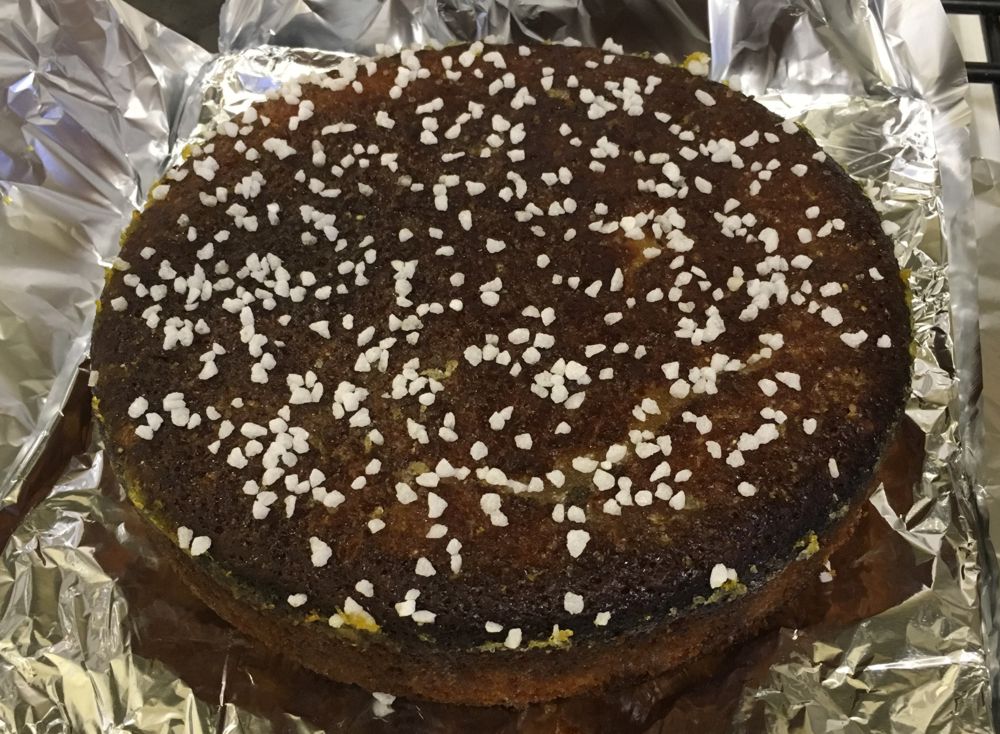
Cider Cake

I was thinking about this cake when I made the toffee apple cake, the other week. This is another seasonal autumnal cake, but in complete contrast it could not be easier. It takes about 10minute to know-together the batter and only about 30min to bake.


This is a really satisfying cake. There's just more than a hint of apples with a pleasant warmth. It's not too rich nor too moreish: a decent chunk leaves you completely satiated.

It did make me think that actually combining this with the toffee apple cake, such as boiling the dates in cider rather than apple juice, really would result in an absolute cracker-jack of a cake.

When I finally finished it off a week later, I may have slightly embellished with some caramelised apples. Yes, it was goooooooood!


Cider cake recipe (taken from Paul Holywood's receipe on Baking Mad)

Ingredients:
100g butter
100g unrefined light muscovado sugar
2 eggs (large)
225g plain white flour
1 tsp bicarbonate of soda
1 tsp cinnamon
150ml dry cider

Method:
1. Heat the oven to 180°C. Grease a deep 18cm/7" round cake tin and line the base with baking parchment.
2. Beat the butter and sugar together with a handheld electric whisk until pale and fluffy, then beat in the eggs one at a time. Sift the flour, bicarbonate of soda and cinnamon together.
3.Fold about a third of the flour mix into the whisked mixture, then fold in half of the cider, with a large metal spoon or spatula. Fold in another third of the flour, then the rest of the cider. Finally fold in the remaining flour until evenly combined.
4. Transfer the mixture to the prepared cake tin and gently level the surface. Bake for 30–40 minutes, until a skewer inserted in the centre comes out clean.
5. Leave the cake to cool in the tin for 20 minutes, then turn out onto a wire rack and set aside to cool completely.

Tuesday, 30 October 2018

Toffee apple cake

I recently helped make a friend make toffee apples (yes, they turned out well - toffee that was very crisp and pleasingly "snap-ful" - although not quite the scarlet red orb that had been desired) and this obviously made me think about a toffee apple cake.

I remembered that during GBBO17, Prue tried Kate's toffee apple cake and declared it the "best cake I've ever had". Now normally, I'd work out my own "ultimate" recipe, but given this intel, I broke with precedent and simply followed the recipe (once I found it online). Having said that, I did make one tweak, which was to replace the internal toffee apples with an apple compote care of Michel Roux.


The cakes turned out pretty well. It's very interesting technique based on a sticky toffee pudding. Very tasty but they did seem a little dry (based on the trimmings from levelling them). And sticky toffee pudding usually comes with lashing of toffee sauce (and cream!). The combination of these factors prompted me to use the compote.


This is the cake equivalent of a warm hug on an autumnal evening in front of the fire, whilst leaves blow outside and drizzle patters against the windows.

The cake is incredibly satisfying and rounded, if you get a bit of everything in one go - the icing, the cake and the apple compote. The spices are gentle and warming. The icing is good and light, I'd prefer a bit more of a toffee hit. Also you don't get hit round the face with apple, but you know it's there providing background depth and sweetness.  Although the apple balls on top didn't quite turn out right, they added a great sharp contrast.


Next time to make it an even more cosy night in, I think I would:
  • Try and get the toffee right for the decorative apple balls
  • (At least) double the amount of apple rings
  • Use a calvados and honey syrup on the cakes

Saturday, 6 October 2018

BFG - not Dahl's giant but a Black Forest Gateaux

I think I spend too much time working at the minute (the 1h45 commute each way may be a factor too) which means I spend less time cooking and baking and have even less time to blog when I do.

I did a German evening tonight which was borne out of an aborted trip to the Black Forest to find the ultimate black forest gateaux. I don't have any photos of any courses but the BFG. Mind you the menu did seem to go down quite well:

Sharing pretzel with cheese and beer dip and a mustard dip
***
Rouladen with home-made sauerkraut and spaetzle
***
BFG


The cake turned out pretty well. I think the best comment was "this reminds me of the cakes of my childhood".

It was very satisfying combination of chocolate, cherry and cream. Amazingly my guests didn't take any home, so I was left eating a slice a day for the next week. Tough gig.

It was incredibly difficult trying to get hold of the right cherries. I wanted morello cherries but could not find them for love nor money. Fortunately, Waitrose came to the rescue where Aldi and Lidl had failed.

The cakes (care of the ever-reliable Felicity) were soaked with a combination of kirsch and the syrup from the cherries. Then a thick layer of rich dark cherry jam was added. Next was Chantilly cream spiked with the kirsch/syrup. I put nearly a whole jar of cherries on top of the cream before the next chocolate sponge layer. Repeat again. The third and final layer of cake was covered with a thick ganache and crowned with glace morello cherries

Sunday, 1 July 2018

Blackcurrant mousse cake

After a ridiculously successful Pick Your Own session, I found myself with nearly a kilogramme of black currants to find a use for. I was thinking about a mousse cake, but because I've been watching Bake Off - The Professionals, I thought I'd turn up the pressure and have a go at an entremet.


The cake had a coffee genoise sponge base, a milk chocolate "mousse" (I'll explain the inverted commas momentarily), caramelised almonds (as a substitute for a feuilletine layer), a blackcurrant mousse topped with a  blackcurrant glaze.

It wasn't half bad. It had a very long flavour. My mouth was constantly excited with each bite. The crunch of the almonds was an excellent foil to the luxurious mousse. The blackcurrant mousse and coffee cake combination is both complex and complementary. The bitterness of the coffee contrasting with the sweet fruit. The chocolate layer helped to seamlessly transition from one to the other. The glaze was intense and provide a real hit of fruitiness.

The only bit that didn't really work was the chocolate mousse. This was supposed to be a ganache, but had added egg yolks and sugar. I think the problem was that I didn't whisk the egg yolks and sugar together enough to form a sabayon, so when combined with the melted chocolate and cream, it didn't really for a mousse.

It's a very complicated recipe with many components, that I ended up making over night. I also wished I had a ring mould rather than a springform tin. De-moulding would have been much easier! I'm actually quite pleased with myself.

I'll give the chocolate ganache another bash and see if I can improve it. Maybe this is the start of an obsession with multi-layered desserts...

Wednesday, 30 May 2018

Cheesecake brownies


I made this cheesecake-brownie mash-up because of a number of reasons:
  • I quite enjoy Paul Hollywood's City Bakes on the Food Network and I caught a repeat of the New York episode where he made these.
  • Last week I made an amazing baked cheesecake (I should have taken photos. I was surprised at how smooth it was: remarkable!).
  • I had a block of chocolate sitting in the cupboard.
  • At work, JW has declared his love of cheesecake on numerous occasions and I thought these would be a good way of sating that appetite.
They turned out pretty well. They are very rich and very chocolatey. They are more of a dessert than a brownie; at room temperature a plate and fork are definitely required. They are incredibly satisfying - you get a big chocolate hit. These do not leave you wanting.

I made some slight alterations to the recipe, based on my successful cheesecake the week before and instinct. I added a little cocoa and substituted in white chocolate chunks.

I think they could do with fewer chinks of chocolate and more cheesecake. I think I'd like the contrast between the brownie and cheesecake to be more pronounced, which I think you'd get if you upped the cheesecake content by 50%. I think it might be better to make them bigger pan thus making the brownies thinner and emphasising the contrast.

Recipe for cheesecake brownies (based on Paul Hollywood's original)

Ingredients:
For the brownie:
200g plain chocolate, 45% cocoa solids
200g unsalted butter
3 large eggs
200g caster sugar
75g plain flour
15g cocoa
1/2 tsp salt
175g white chocolate, chopped into small chunks
1 tsp vanilla extract
For the cheesecake:
180g full fat cream cheese
1tbsp cornflour
15g caster sugar
1 medium egg
½ tsp vanilla extract
60ml ready-made custard

Method:
1. Line a brownie tin 22x29cm, 8 ½" x 11" with baking parchment. Heat your oven to 170°C.
2. Break 225g of chocolate into small chunks and place in a heatproof bowl with the butter. Place over a pan of simmering water and heat until melted. Leave to cool.
3. Beat the eggs and sugar together until pale and the mixture has thickened. Add the melted chocolate and butter mixture to the eggs and stir until thoroughly combined. Fold in the flour, cocoa, salt, chocolate chunks and vanilla extract. Pour into the prepared in.
4. Using an electric whisk on a slow speed, beat the cream cheese with the custard, sugar, vanilla extract and cornflour. Mix until smooth and all the ingredients are combine.
5. Drop spoonfuls of cheesecake mix onto the brownie then using a spatula fold through the brownie to create swirls. Bake for 25 minutes. A little mixture should still stick to a skewer when inserted in the middle of the brownie.
6. Leave to cool completely before cutting into squares.

Sunday, 8 April 2018

Coffee and cardamom cake


This cake came about with a need to provide cake for a cocktail party, which turned into a desire to produce a cake version of an espresso martini (although things took a bit of a turn when I started researching, especially when I read a James Martin recipe) and the need to provide a fiesta of buttercream.

It turned out really well. It's very delicate in flavour and the cardamom makes it incredibly fragrant. It's well balanced, not too sweet, and very long on the palette. It leaves you with a very satisfying hit of cake.

I was toying with making a white chocolate and coffee ganache for the top, or perhaps serving with a chocolate sauce (which would make it more of a dessert) but I think both of these would be over-powering. You could forgo the icing on the side, as well (but that depends on your predilection for buttercream...)

It's especially good with a cup of coffee the day are after baking. On to the recipe...

Coffee and cardamom cake:

Ingredients:
8oz butter, softened
8oz caster sugar
4 eggs
3tbsp strong coffee
Cardamom seeds, ground from 10 pods
8oz plain flour
2tsp baking powder
2oz ground almonds
Coffee liqueur
For the buttercream - this is enough to cover the sides:
9oz butter, softened
18oz icing sugar
Coffee/coffee liqueur, to taste, approx 6tbsp
Chocolate, to decorate

Method:
1. Cream the butter and sugar together until pale.
2. Beat in the eggs, one by one.
3. Stir in the coffee and ground cardamom seeds.
4. Fold in the flour, baking powder and ground almond.
5. Split the cake mix between two greased and lined 8" cake pans, and bake at 180° for 25 mins (or until done).
6. While the sponges are cooling, make the butter cream.
7. Beat the butter, icing sugar and coffee together until smooth, adding coffee/liqueur to taste.
8. Once the cake are cool, split each cake in twain and drizzle with your choice of coffee liqueur.
9. Slather each cake with buttercream and stack.
10. Cover the top and sides with butter cream (if wanted) and decorate with grated coffee.
11. Grab a fresh mug of coffee or shake up an espresso martini, sit back and enjoy a slice.

Wednesday, 27 December 2017

Chestnut chocolate torte

Now anyone that knows me, must know that I think the chestnut is massively underused during the festive season on our fair isle. So, when a friend of mine was leaving for New Zealand, it seemed to me that a fitting farewell cake might be some kind of brownie laced with chestnuts. After reading rave reviews of those from Dan Lepard, they were promptly produced and enjoyed. But that was just the start.

It started me wondering if some kind of chocolate chestnut torte might be in order...


Turns out I was right. The dense brownie base is a perfect foil for a light mousse topping united by the subtle flavour of chestnut. This is a really deep (I think that's the effect of the chestnut puree)rich torte which has a long chocolate flavour which the booze gives a very gentle kick. The chestnuts in the brownie base give textural contrast to the light delicate mousse to sit atop. It's not too sweet. It's a simply beautiful balance.

I'd like to try this with chestnut flour, to see what that adds. You could also get away with twice as much mousse if you wanted. I probably would...

Chocolate Chestnut Torte

Ingredients:
For the brownie base:
100g cooked chestnuts, chopped roughly
100g dark soft brown sugar
50ml bourbon/rum/brandy (your choice) 
1tsp vanilla extract
1 egg, separated
100g butter
100g dark chocolate
35g plain flour
15g cocoa
1/4tsp salt
100g chestnut puree
1tbsp double cream
For the mousse topping:
250g mascapone
300ml double cream
200g chestnut puree
50ml Bailey's Irish cream
Icing sugar (to taste)
To decorate:
Icing sugar
Cocoa
Grated chocolate

Method:
1. Preheat the oven to 170°C and grease and line a 9" round baking tin.
2. Mix the chestnut pieces, 50g of the sugar and the alcohol in a bowl.
3. Melt the chocolate and butter together in a bain marie.
4. Meanwhile, whip the egg white until stiff. Gradually add in the remaining sugar to create a meringue.
5. Beat in the egg yolks.
6. Slacken the the chestnut puree with the double cream and beat into the melted butter and chocolate along with the salt.
7. Sieve in the flour and cocoa.
8. Fold in the meringue.
9. Bake for approximately 25 minutes, until barely set in the middle. Leave to cool.
10. Once cooled remove from the tin and put on a serving plate. Replace the wall of the tin over the base to allow you to build the torte.
11. Whip the cream to light peaks with the Bailey's and icing sugar.
12. Beat the mascapone and chestnut puree, then mix with the Bailey's cream.
13. Cover the brownie base with the mousse and leave to set for a few hours.
14. Once set, unmould and decorate with icing sugar, cocoa and grated chocolate.

Friday, 15 December 2017

Lemon Drizzle cake


I took my first proper cake into work today: a lemon drizzle. This was the same cake as I did for a wedding a couple of years ago, (I never quite managed to blog that one...) so I was reasonably confident but you never quite know. It did seem to go down quite well though.


When making it, it seems like it's more drizzle than cake, so to say it's a moist slice, is an understatement. As someone in the team rightly pointed out though, that's the point! It's still retains a pretty good structure. The different drizzles, I think, give maximum penetration and using different types of sugars gives pleasing textural differences. Oh and it's unashamedly lemony!

Lemon drizzle cake recipe

Ingredients:
200g caster sugar
4 eggs
150ml sour cream
Zest 1 lemon
60ml lemon juice
150ml oil
200g plain flour
1.5tsp baking powder
0.5tsp bicarbonate of soda
Drizzle 1:
4tbsp icing sugar
45ml lemon juice
Drizzle 2: 
70ml lemon juice
Zest 1 lemon
80g demerara sugar
NB: One lemon has about 30ml juice

Method:
1. Line and grease an 8" cake tin and pre-heat the oven to 180°C.
2. Whisk the eggs and sugar together until pale and fluffy.
3. Add the sour cream, lemon zest, lemon juice and oil. Whisk together.
4. Sift the flour, baking powder and bicarb and fold in.
(NB. The batter will seem very liquid, but don't worry it'll be OK)
5. Bake for 45 minutes at 180°C
6. Whilst the cake is baking make the two drizzles by simply mixing together the ingredients until the sugar has dissolved.
7. Once the cake is baked, use a skewer to make holes all over the cake. 
8. Brush on drizzle 1 all over the top of the cake using a pastry brush.
9. Brush on drizzle 2, waiting for each stroke to be absorbed before adding more. This'll take some time.
(NB. It'll seem that there's no way the cake will take that much moisture - it will) 
10. Leave to cool. Unmould and devour.

Monday, 19 June 2017

Nut and caramel cake

This was a cake-based penance. Somehow I was not informed of an impending colleague's birthday thus failed to provide a cake at a suitable moment. Although there wasn't a great burden of expectation (fortunately), I still felt I had failed so to make up for it I offered to make a bespoke cake. I created this based on the direction of:
I love nuts ... and I love anything fudgy/caramely/toffee ...

It's a triple threat: two layers of pistachio cake sandwiching a walnut cake, held together by a maple and pecan cheese icing and smothered in a caramel buttercream doused liberally with assorted nuts (pecans, walnuts, hazelnuts and pistachios).


I spent ages searching Soho for pistachio paste as I really wanted a green cake. Unfortunately it was all in vein as I just can't find it, anywhere (not even in Italian delis!). If I ever do find it, I will definitely be repeating this cake.


Both the cake recipes are quite unconventional and when they came out of the oven I wasn't that confident with how the bakes had gone. I was really quite worried how this was going to turn out. I needn't have been. All the parts came together remarkably well and complemented each other. The different cake textures came together. The light fragrant flavour of the pistachios was a good counterpoint to the heavier walnut (the lemon providing a delightful, gentle, refreshing zing). The various icings complimented the nuts giving a really rounded flavour: neither too sweet nor too bitter. After a while in the fridge it actually cut remarkably well. On top of that it's actually one of my better looking cakes. And the recipient was very happy with it.


Ridiculously I only managed a quick slice before rushing downstairs to an event and when I came back it was all gone. I was quite disappointed. Both in missing out on cake and not being able to do a more thorough set of tasting notes. Oh well. 

On to the recipe. Be warned: it's not short.

Nut and caramel cake recipe

Ingredients:
Pistachio cake (adapted from a Ruby Tandoh recipe):
200g pistachio
250ml sunflower or almond oil
250g caster sugar
1½ tsp vanilla extract
4 large eggs
100g plain flour
1½ tsp baking powder
A pinch of salt
Walnut cake (from a Jeremy Lee recipe):
350g walnuts, shelled and peeled
4 large eggs, separated
225g caster sugar, plus 1 tbsp extra
The finely grated zest of 1 lemon
50g unsalted butter, melted and kept just warm
Pecan maple cream
50g pecans, toasted and chopped
250g mascapone cheese
~60g maple syrup
50g icing sugar
Double cream, if required
Caramel buttercream
100g caster sugar
50ml water
30g butter, cubed
60ml double cream (or replace half with 30ml milk)
150g butter, softened
100g icing sugar
To decorate:
~200g assorted nut, toasted and chopped (I used 50g each of pecans, walnuts, pistachios and hazelnuts)

Method:
1. Preheat the oven to 180°C. 
2. For the pistachio cakes, grease two 8" round cake tins.
3. Using a food processor, blitz the pistachios until finely ground. Beat the oil with the caster sugar, vanilla extract and eggs to create a batter. In a separate bowl, combine the pistachio, flour, baking powder and salt, then lightly fold it into the batter.
4. Divide the batter between the two tins, level the tops and bake for 25 minutes, or until the cakes are just beginning to shrink from the sides of the tins and a knife inserted into their centres comes out clean. Leave to cool in the tins before removing.
5. For the walnut cake, line an 8" cake tin with parchment.
6. Grind the walnuts quite finely, retaining a little of their texture.
7. Put the egg yolks and sugar into a mixer, beating until pale and greatly increased in volume. Take your time here as the lighter and silkier the mixture, the better the resulting cake.
8. Beat the egg whites in another bowl until peaked and stiff. Add the extra 1 tbsp of caster sugar, continuing to beat until stiff once more.
9. Partially fold the nuts and zest into the egg yolk and sugar mixture. Add one‑third of the beaten whites, mix well, then stir in the remainder. Add the melted butter and mix gently. Swiftly decant the batter into the prepared cake tin.
10. Bake for 45 minutes, or until cooked through, ensuring this by inserting a sharp knife into the middle. If clean when removed, then the cake is done. Rest upon a rack until cool.
11. For the pecan maple cream, beat the mascapone until soft then beat in the maple syrup and icing sugar. This is a balancing act between sweetness and flavour - adjust the proportions of each until you are happy. Add a splash of cream to change the texture to your taste. Stir in the pecans. Firm in the fridge.
12. Level off all the cakes and sandwich together with half the maple pecan cream: pistachio, walnut, pistachio.
13. The butter cream is flavoured with a fresh caramel. To make the caramel put the water and sugar in a pan and heat over a medium heat until it reaches a light golden brown.
14. Add the butter, whisking until melted and combined. Take off the heat and whisk in the cream and milk. Decant into a bowl and leave to cool.
15. Beat the butter until soft and then beat in the icing sugar. Finally beat in the cooled caramel. Again change the amount of icing sugar to taste. Firm in the fridge.
16. To finish the cake. Apply a thin crumb layer of the butter cream all over the cake and refrigerate.
17. Liberally apply the rest of the butter cream to the cake and then press the nuts in to decorate.

Friday, 12 May 2017

Kelpot's chocolate pinata cake

Today was Kelpot's last day, so I spent most of last night putting together her leaving cake. Given that Kelly loves both cake and chocolate it was quite an easy design process.

I ended up with a three tier chocolate and vanilla cake, sandwiched with chocolate fudge icing, covered in white chocolate buttercream and decorated with kingsize buttons.


What I hadn't really figured into my night was all the cooling and waiting. Even though I used the buttercream recipe I had used before I was quite worried by the lack of combination and setting early on. Perseverence paid off and with time it made a very good icing.

That wasn't the end of it though. I had to do a three tier cake because I cut the middle cake into an annulus thus creating a cavity to conceal a landslide of Maltesers, Rolos and Munchies.

I wasn't there for the actual cutting, but had briefed a couple of people so that during the slicing they could be assured that nothing was going wrong.

By all accounts it went well. I came back to an office deafened by the silence of post-cake inactivity, so I think it went down pretty well. However, I will leave the final comment to the text message that I received from a colleague:

"SHUT THE FRONT DOOR THAT CAKE IS THE BIZ"

Monday, 6 March 2017

Chocolate and banana cake

I was "commissioned" (I use inverted commas because I wasn't actually paid) to make a cake for a colleague's birthday. 

It was the first time that I've created a cake by completely drawing on elements that I have previously used. The cake used all recipes that I have used before just in a new combination.

The specification was based on the recipients preferred flavours: chocolate and banana with come caramel thrown in to round things out.

It turned out quiet well, despite being an "assembly" job.

 (Yet again, I forgot about taking photos so rushed...)

The flavours all worked really well together. I was worried that it might be rather too sweet, but that fear was definitely not realised. The banana cream brought a freshness with a depth of flavour coming from the chocolate fudge icing. There was a pleasing banana "aroma" permeating through the whole cake. Despite each mouthful being comprised of different elements, the whole thing worked rather well. It has a well-rounded flavour that was long on the palette. 

I initially thought there many have been some benefit it using a butter-based chocolate cake rather than oil-based. however, this was based on trimmings of the cake in isolation. In combination with the other elements, however, I don't think anything need to change.

The recipe drew on the following elements:

Chocolate cake: Banana, chocolate and peanut butter cake with an added 100g melted chocolate added to the batter


Chocolate fudge icing: Half the amount of Icing 4 from the wedding cake tasting with an added 1tsp of cocoa
 

Caramel icing: Twice the amount of the external frosting from the Caramel cake

Monday, 30 January 2017

Strawberry gateaux

As part of my annual January task of "eating the freezer", I am often confronted by items that are quite difficult to find a discrete use for. One such item was some strawberry puree which I made with the remains of my glut of strawberries after my first adventure to a PYO last summer.

I was jammed out and had been stuffing myself for days with the beautiful berries and couldn't face any more. I pureed the remaining half pound and popped it in the freezer where it had quietly sat.

I wasn't quite sure what to do with the puree but once the idea of a strawberry cake stuck me, there was no going back. There are many American recipes available but the vast majority seem to include "jell-o" to get the requisite taste and colour. I was determined that jelly should play no part in my cake.


I was pretty pleased with the result. The cake itself clearly tasted of strawberry although it was more subtle. The jam added "smash-you-in-the-face" strawberry hit. There were clearly strawberries in there. The cake was rich and buttery with a slightly close  texture but it was still light. It wasn't too sweet (which I had feared) and the tang of the cream cheese in the icing was welcome.

The odd thing was the crazy grey-ish colour! I put this down to it being all natural ingredients - no colourings used (although I was tempted!). I'm aware it's a bit dull from the outside, I'd decorate with fresh strawberries, if they were in season.

I wonder if I used an oil-based cake rather than butter the flavour, and colour, might be more pronounced. Perhaps I might even make a foray into the world of chiffon cakes. I'll need a lot more strawberries though...

Recipe for Strawberry Cake with White Chocolate Cream Cheese Icing (adapted from Happy Foodie recipe)

Ingredients:
225g butter
225g caster sugar
4 large eggs
210g plain flour
2tsp baking powder
25g cornflour
225g strawberry puree
1tsp vanilla extract
Strawberry jam for the filling
For the icing:
4oz butter
4oz cream cheese
4oz white chocolate
100ml double cream
2oz icing sugar

Method:
1. Cream the butter and sugar together until white and fluffy.
2. Add the eggs one at a time and beat in. Sifting in a tbsp of flour with each egg will stop the mix splitting.
3. Beat in the strawberry puree and vanilla until combined.
4. Sift in the cornflour, flour and baking powder.
5. Divide the mix between two 8" lined cake tins and bake at 180°C for 25mins, or until done.
6. While the cake is baking, make the icing.
7. Melt the cream and chocolate together in a bain marie. Leave to cool.
8. Beat the butter until soft and pale. Gradually add in the  sugar. Beat in the cooled chocolate and cream mi.
9. Beat thoroughly and refrigerate to cool and thicken.
10. Once the cake and icing are cooled, it is time to construct.
11. Spread a generous layer of jam over one of the cakes. Followed by about a generous helping of the icing (no more than a third) and sandwich the cakes together.
12. Spread a thin layer of icing around the top and sides of the cake and refrigerate. 
13. Once the base layer of icing has set, slather on the remaining icing. 

Wednesday, 11 January 2017

Lime and pistachio cake

This was a cake I made for a leaving do at work last Autumn, but I've been asked for the recipe so it's a very belated write-up.

Sorry about the picture, I blame taking it at work...

I was asked for a vegetable cake and carrot was just to obvious. Once my thoughts turned to courgette, I then got thinking about how to decorate. And green was the only way to go, hence the lime and pistachio. I wanted to try and make the cakes actually green but pistachio paste is very hard to get hold of in SE London! Nonetheless, it went down a treat. A lovely moist cake, with a rich cream cheese icing cut with lime and the occasional crunch from a sweet pistachio.

Lime and pistachio cake

Ingredients:
250g butter
200g caster sugar
3 eggs
1tsp vanilla extract
Juice and zest of 2 limes
200g plain flour
1tsp baking powder
1/4tsp salt
300g courgette (skin on), grated and left to drain in a sieve
75g pistachio + 25g chopped pistachio to decorate
Lime curd filling:
3oz caster sugar
1 eggs, well beaten
Grated zest and juice of 2 limes
2oz butter
Lime cream cheese icing:
50g butter
200g cream cheese
85g icing sugar
Juice and zest of 1 lime

Method:
1. Grease and line two 8" cake tins. Pre-heat the oven to 180°C.
2. Cream together the butter and sugar.
3. Beat in the eggs, one at a time until combined. Add some of the flour after each egg to prevent the mixture splitting.
4. Beat in the vanilla extract, lime zest and juice.
5. Sift in the remaining flour, baking powder and salt and fold until combined.
6. Fold in the grated courgette and pistachios.
7. Divide the cake mixture between two 8" greased and lined cake tins.
8. Bake at 180°C for 25 minutes until the sponge is cooked (the top will spring back and the sides will have come away from the sides of the tin).
9. Whilst the cakes are baking and cooling make the lime curd. Place the ingredients in a heat proof bowl and suspend over a saucepan containing hot water. Cook until the mixture is thick enough to coat the back of a wooden spoon, about 20 minutes.
10. To make the icing beat the butter until soft.
11. Gradually beat in the cream cheese until completely combined.
12. Beat in the lime juice and zest and sugar. (Add sugar to taste).
13. To construct the cake, spread lime curd over the top of one of the cakes.
14. Invert the top cake and spread half the cream cheese icing over the bottom of the cake. Turn this cake the right way up and sandwich the two cakes together.
15. Spread the remaining icing over the top of the cake.
16. Decorate with chopped pistachios and lime zest.

Monday, 6 June 2016

Malteser cake: The revenge!

A while ago I tried out a Malteser cake. It was a mixed success:
  • Decoration - epically good
  • Taste - not quite the malty party in your pants I was after, more like a mingle in your mouth
I can't quite remember how a Malteser cake came up in conversation at work, but it did. Never one to shirk an opportunity to right a cakey-wrong, it meant this weekend the time was ripe to give it another go. 


It's fair to say it's not quite such a looker as the previous attempt (do you realise white Maltesers are about as rare as hens teeth?), but in terms of taste I think this is one of those occasions where there's a meme for that:


The flavour profile was everything I had hoped for: deeply malty with a really long finish. The perfect accompaniment to chocolate. I put it down to using malt extract (available from Holland & Barrett) rather than Ovaltine and in particular substituting some of the sugar to reduce the sweetness. This did mean the cakes were more delicate and needed a slightly longer bake, but that shouldn't be any cause for concern. Anyway you'll soon see what I mean >when you try this recipe yourself.

Malteser cake 
Ingredients:
For the sponge:
8oz butter
5oz Muscavado sugar
2oz caster sugar
4tbsp malt extract
4 eggs
7oz plain flour, sifted
1oz cocoa, sifted
2tsp baking powder
For the filling:
60g white chocolate50ml double cream
15g butter aka a small nob 
For the frosting (this will make plenty to cover the top and side):
8oz butter
150g icing sugar (approximately)
1.5tbsp malt extract
1tsp vanilla extract
Decorate with as many Maltesers as you dare (I used 6 packs)

Method:
1. Make the sponge in the usual way by creaming the butter and sugars until pale and fluffy. Then beat in the eggs and the malt extract. Fold in the sifted flour, baking powder and cocoa.
2. Divide the batter between two 8" pans and bake for about 20-25mins at 180°C (or until the top springs back to the touch, the sides are coming away from the tin and a skewer comes out clean from the middle).
3. While the cakes are baking and cooling make the ganache and frosting.
4. For the ganache, melt the white chocolate and cream together in a bain marie. Once melted, take off the heat, add the butter and stir to mix together. Allow to cool..
5. To make the frosting, beat the butter and sugar together until soft. Add the vanilla extract and malt extract and beat together. Add more sugar, if required, to suit your tastes.
6. Once the cakes have cooled, sandwich togther using the white chocolate gnache.
7. Cover the cake in a thin layer of icing (the crumb layer) and refrigerate to set.
8. Once set, use the remaining frosting to ice the cake liberally.
9. Decorate with as many Maltesers as you want.

Wednesday, 22 April 2015

Vegetables cakes

Today at work Millertime came to an end. What better way to mark the occasion than with an assortment of cakes?

Given that she proclaimed significant adulation at the recent carrot and courgette layer cake (and as a nod to her commitment of never having eaten meat) an array of vegetable-based cakes was the order of the day.

The first conundrum was just what vegetables to use (for once seasonality would have to be by-passed as this would have just been too restrictive)? Carrots were ruled out straight away due to the ubiquity of carrot cakes. After some research I was left with beetroot, parsnip and courgettes as my vegetables. The remaining question was just how to "cakify" them? I ended up going with: 
  • Beetroot brownies;
  • Parsnip cupcakes with maple syrup butter cream; and
  • Courgette muffins with lime cream cheese frosting

These all went down remarkably well. (Mind you I was reasonably confident as the naked muffins and cupcakes had gone down very well in a little taste-test-preview with the Aussie yesterday)

The muffins were stupidly moist even two days after baking. They had a loose crumb structure making them very light. The lime flavour was very strong to begin with but faded to a subtle sweetness. Fortunately they weren't too sweet and the icing gave a good contrast (although arguably slightly dominant). It was a shame that the pistachio wasn't more prominent. This might have been down to chopping them too finely, bigger pieces may have worked better.

The parsnip cakes were like nothing else I have ever baked. The texture was fantastic: quite crumbly, so moist as to be almost on the verge of falling apart, but with a pleasingly slightly crisp top. The flavour was dominated by coconut. The maple syrup added a nice hit of sweetness. Overall it was a very pleasing little cake but with a surprising lack a unique taste given the remarkable blend of ingredients.

The brownies were excellent and possibly the best of the three. They were gooey but at the same time light (possibly due to my new found trick of whipping the eggs and sugar to ribbons stage). The flavour was fully developed and was deep, rich and long (I think due to the use of both cocoa and chocolate) with an ever so slight earthy undertone from the beetroot. All in all a crackin’ brownie.

On to the recipes.

Parsnip cupcakes with maple syrup icing (adapted from this Henry Dimbleby recipe from The Guardian)

Makes ~20

Ingredients:
250g butter, softened
250g caster sugar
4 eggs
150g rice flour
2 tsp baking powder
100g desiccated coconut
200g cashew nuts, finely chopped
250g parsnips, finely grated
About 4 tbsp milk
For the maple syrup icing:
4oz butter, softened
6oz icing sugar
4tbsp maple syrup
To decorate:
50g dessicated coconut

Method:
1. Cream together the butter and caster sugar in a mixing bowl, then add the eggs to the mixture one by one, beating well after each addition.
2. In a second bowl, sift the rice flour with the baking powder and mix well. Add the coconut, cashews and grated parsnip.
3. Combine the two bowls of ingredients, adding the milk slowly, until the cake mixture reaches “dropping” consistency.
4. Line a tart or muffin tray with 12 muffin cases.
5. Divide the mixture between the 12 cases (roughly fill each to approximately 3/4 full) and bake at 150°C for 35 minutes (check after 30mins), or until a skewer inserted in the centre comes out clean. Set aside to cool.
6. To make the icing, beat the butter until smooth and gradually sift and beat in the icing sugar.
7. Beat in the maple syrup (add more to your taste) and add water as required to get a smooth consistency. Ice each cake with ~1dsp of icing
8. To decorate, dry fry the dessicated coconut until golden and sprinkle on top.

Beetroot brownie (adapted from this Small Steps recipe)

Makes ~18

Ingredients:
250g dark chocolate chopped
200g unsalted butter, cut in cubes
250g beetroot, cooked
3 eggs
1/2tsp vanilla extract
200g caster sugar
50g cocoa powder
50g flour
1tsp baking powder

Method:
1. Melt the chocolate and butter together in a bain marie.
2. Whisk the eggs and sugar together until they reach the ribbon stage: light and fluffy and a trail of mix can be seen if the whisk is wafted over the top.
3. Whizz the cooked beetroot in a food processor, adding the egg and sugar mix and the vanilla. Mix until smooth.
4. In a separate bowl, sift the cocoa powder, flour and baking soda together.
5. Stir the beetroot mixture into the melted chocolate and fold in the dry ingredients.
6. Use parchment paper to line a rectangular tin, pour in mixture and bake at 180°C for 30-35mins, until firm to touch.
7. Leave to cool in the tin, then cut into portions.

Courgette muffins (adapted from this GoodtoKnow recipe)

Makes ~12.

Ingredients:
250g courgettes (about 2-3 medium-sized)
2 large eggs
125ml vegetable oil
150g golden caster sugar
225g self-raising flour
½ tsp bicarbonate of soda
½ tsp baking powder
50g pistachio, chopped
Juice and zest of 1 lime
For the lime cream cheese icing:
200g cream cheese
50g butter, softened
100g icing sugar
Juice and zest of 1 lime

Method:
1. Grate the courgettes and leave them to drain in a sieve hung over a bowl.
2. In a large mixing bowl, add the eggs, vegetable oil and sugar and beat until well mixed and slightly fluffy
3. Sieve in the flour, bicarbonate of soda and baking powder and beat together.
4. Finally, add the drained courgette, pistachios and the lime juice and zest and divide the mixture between the 12 muffin cases.
5. Bake at 180°C for 20-25 mins or until the muffins are nicely brown and firm to the touch. Allow to cool completely before icing.
6. To make the icing, beat the butter with the icing sugar until smooth. Beat in the cream cheese and the lime juice and spread generously over the top of each muffin.
7. Decorate each muffin with a sprinkle of lime zest.

Monday, 6 April 2015

Peanut butter and salted caramel cake

Cakes for work have turned into requests recently. It was N's birthday on Wednesday and a cake was required to mark the occasion. Given that she is 

obsessed with salted caramel and love peanut butter also

what could I do but try and incorporate those into a cake? 

I went for layers of peanut butter cake and chocolate cake, sandwiched by a salted caramel and finished with a peanut butter butter-icing.


I'm always worried when I've made a cake to "order" as I just hope it lives up to expectations. Thankfully I think this one did. Remarkably when the e-mail went out to the team a queue formed!

The peanut butter cake was quite subtle which, it turns out, was a good think. The peanut butter hit came from the wondrously rich icing which was offset by the bitter chocolate layer (the chiffon cake that I had previously used for my banana, chocolate and peanut butter cake) and the salty caramel. (I was a bit worried about the salted caramel as it seemed to split slightly as it cooled. It was also terribly difficult to spread.) All the elements worked harmoniously together to give a rather satisfying cake.


Peanut butter and salted caramel layer cake

Ingredients:
For the peanut butter cake (adapted from The Woks Of Life Classic Peanut Butter cake):
145g plain flour
1tsp baking powder
1/2tsp bicarbonate of soda
1/4tsp salt
4tbsp oil
65g smooth peanut butter
84g caster sugar
2 eggs
1/2tsp vanilla extract
118ml buttermilk
For the chocolate cake:
4 eggs
4oz caster sugar
3oz plain flour
1oz cocoa
3tbsp boiling water
2tbsp vegetable oil
1tsp baking powder
1tsp vanilla extract
For the salted caramel (adapted from Felicity Cloake's perfect recipe):
200g white sugar
125ml water
100g butter, cubed
75ml double cream
1tsp sea salt
For the peanut butter icing:
6oz smooth peanut butter
3oz butter
9oz icing sugar
Milk
To decorate:
Reese's peanut butter cups, halved

Method:
1. For the peanut butter cake whisk together the flour, baking powder, bicarbonate of soda and salt and set aside.
2. In a separate bowl beat together the oil, peanut butter, and sugar until smooth. Beat in the eggs one at a time, followed by the vanilla. 
3. Add the dry ingredients to the peanut butter mixture, alternating with the buttermilk, starting and ending with the dry ingredients. Fold it all together gently until smooth.
4. Put the batter into a lined and greased 8" cake tin. Bake for at 180°C for 25-30 minutes at 180°Cor until the cake is done (a skewer comes out clean and the sides are starting to pull away from the tin). Allow to cool.
5. For the chocolate cake, separate the egg yolks and whites. Whisk the egg yolks, sugar, oil, water and vanilla into a smooth batter.
6. Sieve in the flour, cocoa and baking powder and beat until combined.
7. Whisk the egg whites until stiff then fold into the chocolate mixture.
8. Put the batter into a lined and greased 8" cake tin. Bake at 180°C for 40mins or until the cake is done (a skewer comes out clean and the sides are starting to pull away from the tin). Allow to cool.
9. For the salted caramel, put the sugar in a wide, heavy-bottomed pan and pour over the water. Set over a medium heat and keep an eye on it as the sugar melts and begins to brown.
10. Once it turns a deep, but not dark, amber colour, take it off the heat and whisk in the butter until it is completely melted, then stir in the cream and ½ tsp salt.
11. Once you have a smooth sauce, scoop a little up on a teaspoon, allow to cool, and taste for seasoning; add more salt if you like. (Add a little milk if it is too thick).
12. For the peanut butter icing, beat together the peanut butter, butter and icing sugar. Use a milk to get a good consistency.
13. To construct the cake, first halve the two cakes. then sandwich together using a third of the salted caramel (this may be best spread slightly warm). Alternate between chocolate and peanut butter cake layers.
14. Use a small amount of the peanut butter icing as a crumb layer and cover the whole cake. Chill.
15. Generously ice the cake with the remaining peanut butter icing.
16. Decorate with the halved Reese's peanut butter cups.

Sunday, 17 August 2014

Choc-a-holic birthday cake

I was at a birthday gathering today at the Leather Bottle in Earlsfield for which I provided an impromptu cake. When I say impromptu, I mean that I offered to bring cake only yesterday afternoon...

Now the birthday boy is a big chocolate fan, so it was obvious what sort of cake to make, the only question was how to make it a stand-out birthday cake? Embellishment with an assortment of chocolate-based biscuits and sweets seemed to be an appropriate answer

It was an 8" chocolate Victoria sponge with a dark chocolate ganache filling, covered in chocolate butter cream and encircled by white and milk chocolate Cadbury Fingers. The cake was then topped with four different types of chocolate confections:
  1. Minty Aero balls;
  2. Peanut M&Ms;
  3. Smarties; and my favourite
  4. "The Danger Quarter" - Revels!
I'm always a bit worried in situations like these*, when there seems to be a high level of expectation, that people will be disappointed. Thankfully I don't think they were.

*This definitely wasn't made any more stressful by running out of enough Fingers four fifths of the way through decorating the cake on a Sunday morning when the only local shop that sells white chocolate Fingers doesn't open until 11am and you are supposed to be at the event at noon...

Monday, 11 August 2014

Alfajores

Last month at the Canary Wharf summer Lunch Market, whilst I was buying an empanada, I spotted some rather intriguing sandwich biscuits. These turned out to be "alfajores": shortbread biscuits sandwiched together with dulce de leche and lightly dusted with dessicated coconut. Apparently these little treats are eaten all over South America not just Argentina (although that may be where the originated).

Clearly as I am not one to turn down a new sweet treat, I had to have one. And glad I was that I did. Melt in the mouth shortbread with a rich caramel filling. What's not to like? A very satisfying little treat. I an quite understand how they are devoured all over an entire continent. The real question is just why have I never had one before?

It also became quickly apparent, that these would be perfect for (what is quickly becoming) my regular fortnightly work cakes.  

Finding recipe was pretty easy. Finding a jar of dulce de leche was more taxing. Now, I know that I could have taken the condensed milk route, but I wanted something more "authentic". I eventually tracked down jar of Merchant Gormet Dulce de Leche from Asda(!).

These turned out rather well. Given how very short the biscuit dough was I had my doubts but the were ill-founded. The biscuits were crazily short and had that smooth melt-in-the-mouth quality that cornflour brings. The lime in the biscuits perfectly offset the richness of the caramel. The caramel itself provides a very long finish. I could have been slightly more generous with my caramel, but I was worried about running out before I made all the sandwiches.

Recipe for Alfajores (adapted from Cooking with Books)

Ingredients: 
200g plain flour
300g cornflour
1/2tsp baking powder
200g unsalted butter, softened
150g caster sugar
2 medium egg yolks
1tbsp vanilla extract
Fresh lime zest
Juice from 1 lime
A jar of Dulce de leche
Dessicated coconut, toasted

Method:
1. Sift the flour, cornstarch and baking powder together and set aside.
2. Cream the (very) soft butter and sugar together until pale.
3. Add the egg yolks, vanilla extract, lime juice and zest.
4. Add all the dry ingredients at once and mix until completely incorporated.
NB The dough is VERY dry (resulting in a very short cookie). However, add a dessert spoon of water at a time to ensure the dough fully comes together. DO NOT work the dough as you'll develop the gluten and make the biscuits tougher.
5. Form the dough into a fat disc, wrap in cling film and leave to rest in the fridge for 30mins.
6. On a floured board, roll out a quarter of the dough at a time. Aim for about a 1/4 inch thickness. Cut into 2" circles.
7. Place the dough circles on a lined and greased baking tray. They can be placed close together as the biscuits will not spread.
8. Bake for at 160°C for10-12 minutes. (Don't let them brown.) Cool.
9. Meanwhile in a dry pad gently toast the coconut until lightly browned. Set aside and cool.
10. Once both biscuits and coconut are cool, it's time to assemble. Slather dulce de leche on the underside of a biscuit and sandwich using another biscuit.
11. In a wide bowl take 2dsp caramel and mix in 2tsp of water to lightly slacken the caramel. Roll the biscuits in the runny caramel sauce and then the shredded coconut.
12. Try not to eat them all at once...

Saturday, 12 July 2014

Picnic in Regent's Park: Picnic loaf and raspberry & white chocolate cake

K organised a picnic in Regent's Park today as part of her birthday celebrations. Given it was a bring your own affair and a fair-sized gang was expected, I thought I'd take "big" things to share.

This also gave me an opportunity to finally make a picnic loaf, which I have been wanting to make for an age (most probably inspired by James Martin on Saturday Kitchen). Basically you hollow out a whole loaf of bread and fill it with tasty stuff, so each slice (and indeed bite) is an explosion of tastes.

As it was a birthday celebration, I was compelled to make a birthday cake so went for a seasonal raspberry and white chocolate affair.


The picnic loaf lived up to expectation. It was stuffed with layers of chilli red onion marmalade, avocado, mozzarella, griddled chicken thigh, and tomato. It was immensely satisfying with each mouthful including a little but savoury, sweet, bitter, salty and sour: a completely rounded flavour profile. The variety of fresh vegetables made sure it wasn't too heavy.

The picture is of one I made the next day with feta instead of mozzarella, grated carrot and an attempt at giardiniera. This goes to show the flexibility of the recipe. Equally as epic as the first. 

These are known as "pan bagnat" in Nice or as "muffaletta" in New Orleans. Both much more romantic terms than the prosaic "picnic loaf". 


The cake was a success despite my worries of transporting it on the Tube and the searing afternoon sunshine which K had somehow managed to conjure up. The sponge was very moist with a delicate crumb. The lemon and raspberry offset the rich sweetness of the white chocolate buttercream very well.


The cake not only went down well, with practically everyone hoovering up a slice, but also acted as a strong bartering tool in the cake for wine scheme K had set up resulting in a rather smart glass of fleurie for me. Given the sunshine and the general relaxed nature of the afternoon, I completely forgot to take a picture of a slice until the sun had done its work and the cake was a little past its best. It turns out butter cream melts when placed in direct sunshine for hours on end. Who knew?

I tried a crazy two ingredient buttercream for the white chocolate icing. As easy as it was to make, I think it probably needs some icing sugar to keep it stable.

Recipe for a Picnic Loaf

Ingredients:
1 ripe avocado
Lime juice
Red onion marmalade
3 chicken thighs
Beef tomato, thinly sliced
Mozzarella, sliced
Loaf of bread

Method:
1. Take the skin off the chicken thighs and de-bone. Sandwich between two layers of cling film and batter out.
2. Oil and season the chicken and cook on a griddle. Allow to cool.
3. Peel, de-stone and slice the avocado. Douse gently in lime juice to and tang and prevent discolouration.
4. Cut the top off the loaf of bread and hollow out the inside leaving a layer below the crust of approximately 1/2". You can also scoop a little of the bread from the lid.
5. Generously spread onion marmalade on the bottom of the loaf
NOTE: You can make this yourself. Or just buy. I made mine with four thinly sliced red onion, a finely diced red chilli (seeds removed) and soft brown sugar. Simply throw in a pan with a slug of olive oil and leave over very low heat until the onions are tender and caramelised. Finish with a glug of balsamic vinegar.
6. Layer up the ingredients until the loaf is full, not forgetting to season each layer liberally. I think my layers were: avocado, tomato, chicken, tomato, mozzarella, avocado.
7. Slather the lid with more onion marmalade and press back on the filled loaf.
8. Tightly wrap the loaf in cling film (you may need three or four layers).
9. Place the loaf on a tray, put another tray on top, weigh down and leave. An hour will do but overnight will result in an even more compressed loaf which will be easier to slice.

For the second loaf, I ran out of onion marmalade so made a quick giardiniera, which went amazingly well.

Ingredients:
Stick celery, peeled and finely sliced 
1tbsp capers, rinsed
Garlic clove, crushed, 3tbsp olive oil
1tbsp red wine vinegar
1tbsp dried chives
(You should also add 100g green olives (stuffed with pimento, ideally) and shallots would be better than the chives. I had neither of these in the cupboard so went without) 

Method:  Mix and leave to mingle!

Recipe for Raspberry and White Chocolate Cake

Ingredients:
4 eggs
8oz plain flour
2tsp baking powder
8oz butter
8oz caster sugar
1oz ground almonds
100ml raspberry purée (from ~150g raspberries)
Zest of one lemon
Juice half a lemon
For the buttercream:
212g white chocolate
281g butter
A few raspberries, crushed
To decorate:
Raspberries
White chocolate buttons, ~150g

Method:
1. Cream the butter and sugar together until pale.
2. Beat in the eggs, one at a time, alternating with a spoon of sieved flour (to prevent curdling).
3. Beat in the lemon juice, zest and raspberry purée. Stir in the ground almonds.
4. Sieve the plain flour and baking powder together and fold into the batter.
5. Divide the batter between two lined and greased 8" round cake tins.
6. Bake at 180°C for approximately 25mins. Bake until a skewer comes out clean.
7. To make the butter cream, melt the butter and white chocolate together in a pan over a low heat until melted.
8. Allow to cool then refrigerate until solid.
9. Put the solidified mixture into a bowl and then beat until fluffy and light.
10. To put the cake together, spread approximately a quarter of the icing on top of one of the cakes. Then spread over some crushed raspberries. Sandwich the cakes together.
11. Thinly ice the cake all over (the crumb layer) and refrigerate until set.
12. Spread the remainder of the icing over the cake, again refrigerate to set
13. To decorate, insert buttons vertically around the rim of the cake then carefully place raspberries to fill the top. Use more buttons to decorate the sides of the cake.
Related Posts with Thumbnails